How to Hang a Shower Curtain Around a Clawfoot Tub
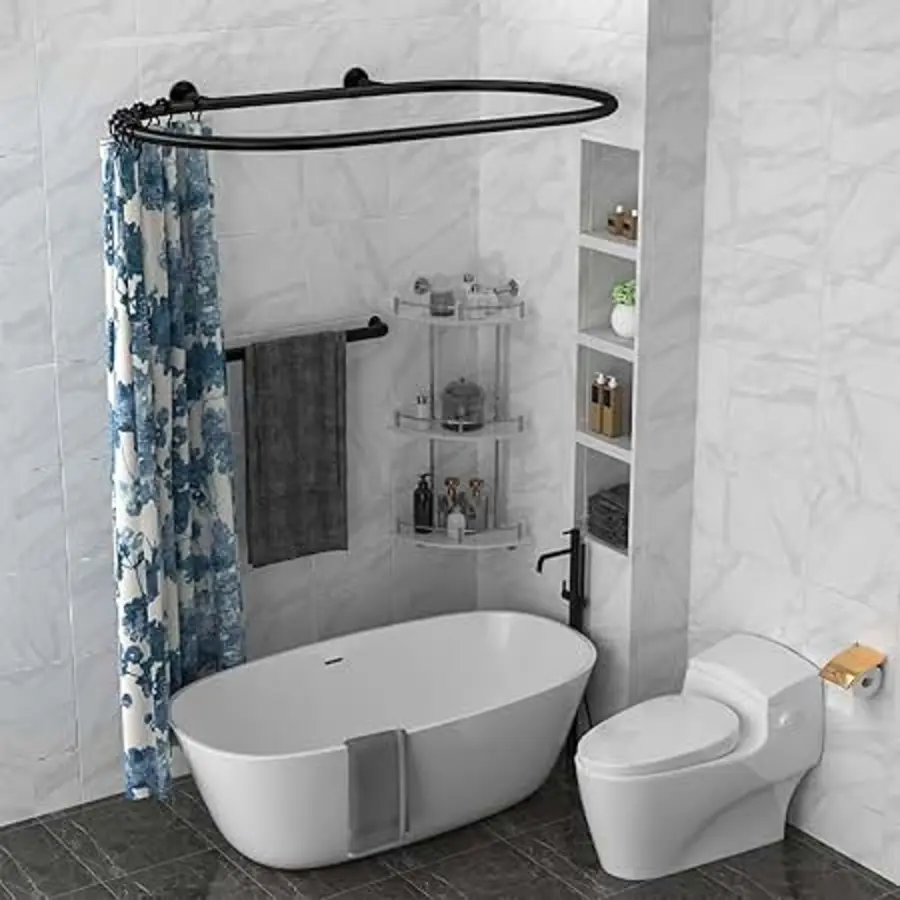
A clawfoot tub shower curtain hangs correctly when the surrounding rod follows the tub closely, the curtain is wide enough to cover the open sides, and the liner drops inside the tub rather than outside it. Start by planning the rod position, then choose the curtain and liner panel layout, attach the rings evenly, and check the opening and water containment before finishing.
Most clawfoot-tub shower setups use an oval or rectangular rod suspended from the ceiling, although U-shaped, D-shaped, and bendable rods can work when full coverage is not needed. The exact arrangement depends on the tub, shower location, windows, and bathroom walls, so measure the space before buying curtains or drilling anything.
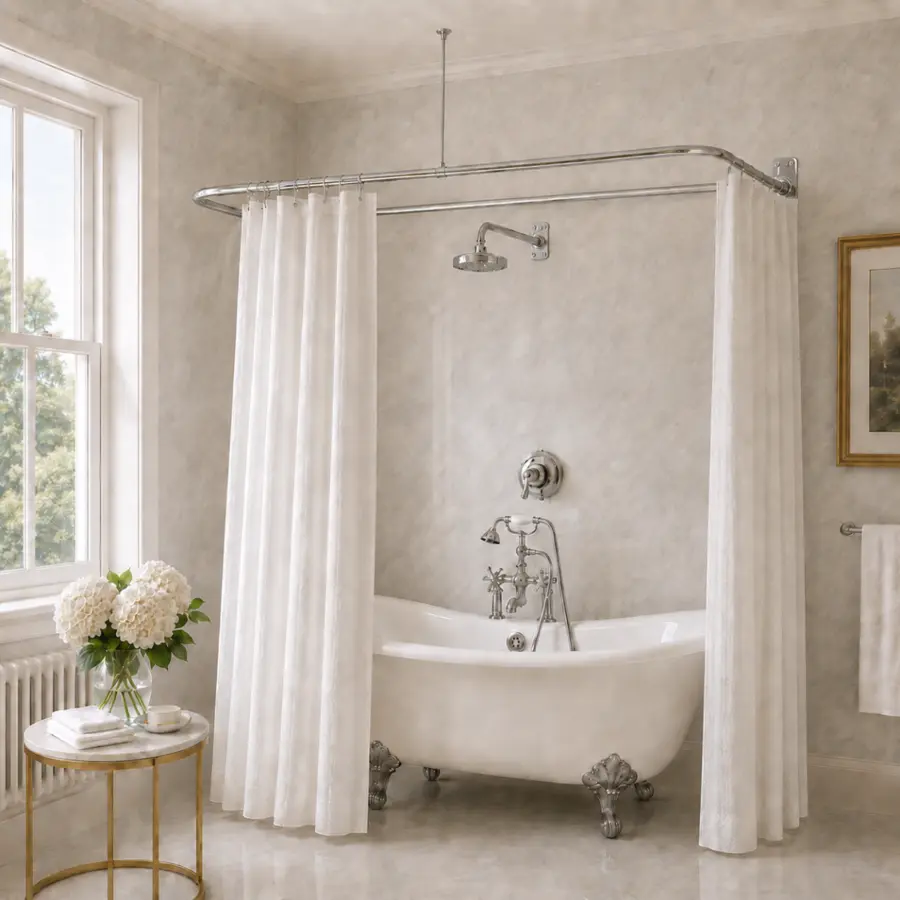
Source: vintagetub
1. Plan the rod position before installing it
Set the rod position from the tub, not from the curtain. The rod should surround the bathing area with enough room for the curtain to hang without pressing against the tub or leaving large gaps at the sides.
Measure these points first:
- The overall length and width of the tub
- The distance from the tub rim to nearby walls, windows, and fixtures
- The location of the shower riser or shower arm
- The ceiling height and possible support locations
- The place where the curtains will open and overlap
A rod that is slightly larger than the tub can help the liner fall inward without clinging directly to the bather. It also gives the curtain more room to clear the tub rim. However, an oversized rod can make the curtains difficult to close and may leave exposed areas where water can escape.
For many standard installations, the rod is positioned about 75 to 77 inches above the bathroom floor. This is a starting point rather than a universal rule. Curtain height, tub height, ceiling height, and the rod manufacturer’s instructions all affect the final location. Leave enough space below the curtain so it does not drag on the floor, while making sure the liner reaches well inside the tub.
If the rod is ceiling-mounted, mark every support point before drilling. Follow the mounting hardware instructions and confirm that the supports are attached as required for the ceiling material. A large oval or rectangular rod can be awkward to hold in place, so having another person steady it during marking and installation can make the work easier.
2. Choose the curtain and liner layout
A freestanding tub often needs more fabric than a standard wall-to-wall shower. A typical shower curtain measuring 72 by 72 inches may not wrap far enough around a clawfoot tub, especially when the rod surrounds most or all of the tub.
You can use one of these common layouts:
- Several standard-width panels: Multiple curtain and liner panels distribute the coverage around the rod and are easier to replace individually.
- A continuous custom curtain: One wide curtain can create a smoother appearance but requires accurate measurements and suitable hardware.
- An outer curtain with separate liner panels: This combines a decorative fabric layer with practical waterproof liners.
Some freestanding-tub installations use curtains about 180 inches wide when the rod encircles the tub. Custom curtains may also be around 68 inches tall when the rod is mounted from the ceiling. These figures are useful starting points, not fixed requirements. Measure the actual rod path and choose curtains that meet or exceed the needed width without being pulled tight.
The liner is the water-containment layer. It should be able to follow the rod around the tub and extend far enough down to direct water into the basin. If you use multiple liner panels, make sure their edges overlap at the opening and at any other panel junctions.
3. Install the rod and supports
Once the layout is marked, assemble the rod according to its instructions. For a surrounding clawfoot tub rod, the vertical supports should hold the ring level and keep it centered over the tub.
Before fully tightening the hardware, check the rod from several positions in the room. Look for these problems:
- The rod is noticeably closer to one side of the tub than the other.
- The opening sits directly under the shower stream.
- A support blocks a window, cabinet, or light fixture.
- The rod slopes enough to make the curtains gather unevenly.
- The curtain path does not clear faucets or other fixtures.
A level-looking rod is important, but alignment with the tub and shower area matters just as much. Make adjustments before hanging the curtains, when the rod is easier to move.
4. Add the rings and space them evenly
Count the ring positions before hanging the panels. The number needed depends on the rod design, the number of curtain panels, and the number of eyelets in each panel. Use a ring at each eyelet unless the curtain or hardware instructions call for a different arrangement.
Space the rings evenly around the rod. Uneven spacing creates deep folds in some areas and stretched fabric in others. It can also make the liner pull away from the tub at the corners.
If the rod has a fixed opening or a removable section, place the curtain panels so they can move smoothly through that point. Avoid forcing rings over joints, sharp edges, or support brackets. If the rod uses carriers rather than loose rings, install the carriers before closing the track or mounting it, as required by the track design.
5. Position the opening where it works best
The curtain opening does not have to be at the center of the tub. Place it where it provides comfortable entry without leaving the shower stream aimed at the gap.
In many bathrooms, the opening works best on the side opposite the showerhead or slightly away from the strongest spray. Let the two curtain edges overlap by several inches when closed. If a window, wall, or plumbing fixture determines the entry point, adjust the panel arrangement instead of leaving an uncovered section.
A small opening at the top or side can help reduce the enclosed, clingy feeling that sometimes develops inside a curtain enclosure. Keep the lower edges closed during the shower, particularly near the showerhead and the ends of the tub.
6. Hang the liner inside the tub
Hang the liner on the inside row of rings if your setup has separate inner and outer positions. The decorative curtain belongs on the outside row. With a single curtain, the waterproof side should face the shower area.
Before showering, pull the liner fully around the tub so its lower edge falls inside the basin. The liner should not hang over the outside rim, where water can run onto the floor. At the ends of the tub, check that the liner reaches close enough to the wall or surrounding curtain edge to avoid a direct path for splashing.
Do not pull the liner so tightly that it lifts away from the tub at the corners. It needs enough fullness to follow the rod and enough slack to sit inside the basin. If it repeatedly billows inward, a heavier liner, a weighted hem, or a rod with slightly more clearance may help. Leaving a modest gap in the upper curtain area can also allow humid air to escape.
7. Check water containment before regular use
Run the shower briefly and inspect the setup from outside the tub. Watch the corners, panel overlaps, curtain opening, and areas near the showerhead. The most common problems are not usually in the middle of the curtain; they occur where two panels meet or where the liner does not reach far enough into the tub.
Use this final checklist:
- The rod is centered over the tub and does not slope noticeably.
- The curtain covers the full rod path needed for the shower area.
- The liner hangs inside the tub on every side.
- Panel edges overlap when the curtain is closed.
- The opening is away from the strongest spray.
- The liner does not cling so tightly that it pulls out of the basin.
- The curtain clears the floor and does not drag.
- The rings move without catching on supports or rod joints.
If water escapes, correct the curtain position before replacing the entire setup. Move the opening, add overlap, redistribute the rings, or use a wider liner where the gap occurs. A well-planned rod and properly placed liner usually solve more problems than simply adding extra fabric.
Common mistakes to avoid
Using a standard curtain without measuring the rod
A 72-inch curtain may be suitable for a conventional shower but too narrow for a surrounding clawfoot-tub rod. Calculate the coverage around the rod before choosing the panels.
Installing the rod too close to the tub
A tight rod can force the liner against the bather and make the curtain difficult to draw. Allow enough clearance for the liner to fall inside the basin.
Hanging the liner outside the tub
The decorative curtain may hang outside the rim, but the liner should direct water into the tub. Check this after every cleaning or curtain adjustment.
Placing the opening under the showerhead
Even a good liner can allow water through an opening exposed to direct spray. Shift the opening and overlap the panels instead.
Spacing the rings by eye
Uneven ring spacing causes uneven folds and can pull the curtain away from the tub. Mark or distribute the rings around the rod before attaching the panels.
The goal is not simply to surround the clawfoot tub with fabric. The rod, rings, curtain panels, and liner must work as one system: the rod provides clearance, the panels provide coverage, and the liner keeps the water inside the tub.
References
- Shower Curtain Sizes: The Complete Guide for Clawfoot and Corner Tubs – Sand Snow Linen. (n.d.). https://www.sandsnowlinen.com/blogs/blog/shower-curtain-sizes-the-complete-guide-for-clawfoot-and-corner-tubs
- Curtains, Hooks and Rods: How to Outfit Your Clawfoot Tub With a Showe – Cheviot. (n.d.). https://cheviotproducts.com/blogs/news/curtains-hooks-and-rods-how-to-outfit-your-clawfoot-tub-with-a-shower
- Curtains for Showers and Claw Foot Tubs | Curtain-Tracks.com. (n.d.). https://www.curtain-tracks.com/blog/category/curtains-for-showers-and-claw-foot-tubs.html
- How to Add a Shower to a Claw-Foot Tub | Ask This Old House. (n.d.). https://www.youtube.com/watch?v=J1BiQzM0Upo
- The Definitive Guide to Owning a Clawfoot Tub. (n.d.). https://food52.com/story/26052-how-to-use-a-clawfoot-tub
- Need help with clawfoot tub and shower curtain hugs. (n.d.). https://www.reddit.com/r/centuryhomes/comments/11cz6xv/need_help_with_clawfoot_tub_and_shower_curtain
- Tips for shower curtain around a claw foot tub with shower | Mumsnet. (n.d.). https://www.mumsnet.com/talk/home_decoration_pictures/4816639-tips-for-shower-curtain-around-a-claw-foot-tub-with-shower
- How to improve a clawfoot tub shower setup?. (n.d.). https://www.facebook.com/groups/1706748102970911/posts/3799214527057581